Friday 22 June 2018

Turn around at Halmstad

This was a refight in 2mm at about 1:1 scale of the battle of Halmstad using Field of Glory Renaissance rules  the figures or should i say bases were redesign from the forward march studio range with some heavy modifications by me

As it turned out the Danish in the real battle suffered some really heavy casualties however in this refight they kept their cool while the Swedish panicked and fluffed their orders , the ground was not cavalry friendly which played into the Danish pistol cavalry as the Swedish had their impact cavalry in the front rank. The stream i designed and 3d printed.

Setup


End of Turn 1 
saw the Swedish advance on both flanks and also some of its centre units with the odd lucky cannon shot from the Danish


End of Turn 2
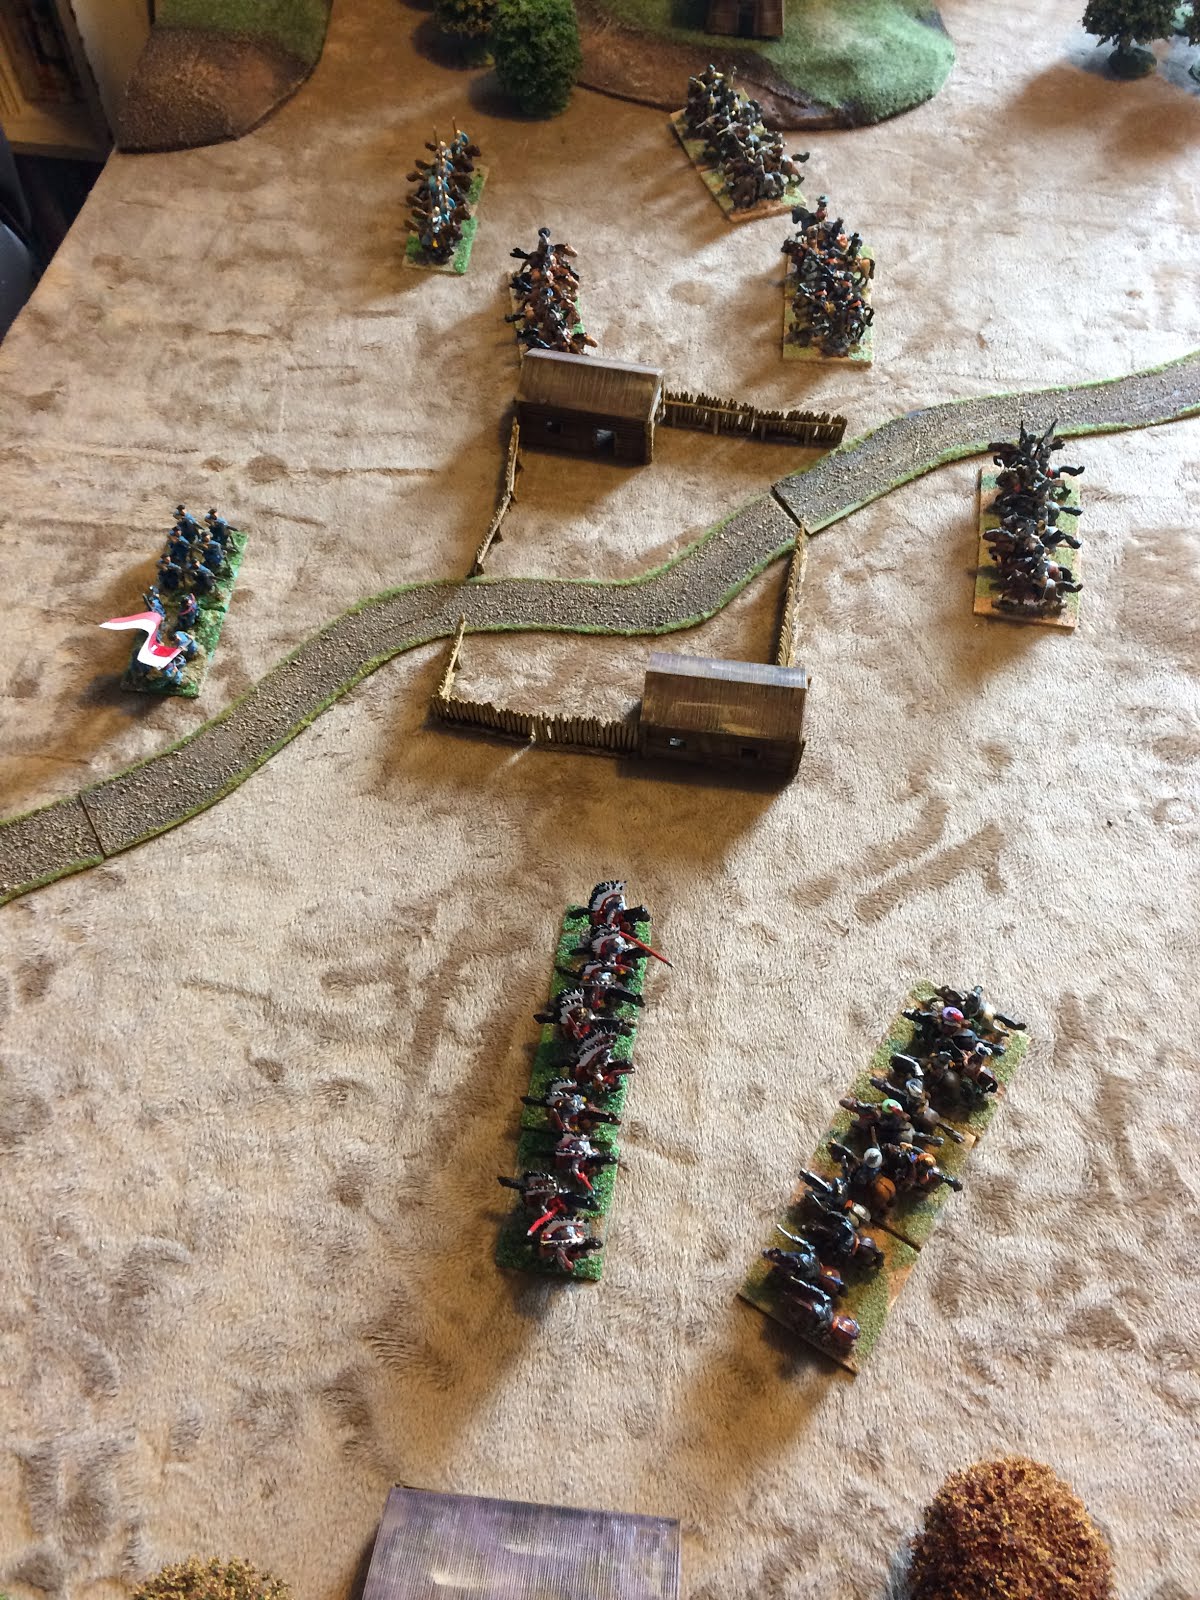
This is where it started to go wrong for the Swedish as some of their cavalry ( at the bottom of the picture ( failed to charge and allowing the Danish pistol cavalry to stop the charge in its tracks

End of turn 3 with the Danish winning the bottom cavalry melee the rot started as other units decided to join the rout , this was helped by fire from Danish dragoons and infantry, meanwhile at the top of the map the Danish cavalry held on.

End of turn 4
The Danish forces at the bottom of the map continued to destroy the forces in front of them while at the top they are hanging on with grim death

I decided to stop the game here as the Swedish had lost 1/3rd of their forces while the danish 1/6th

Primarily the Swedish lost because of the bad ground and their inability to control the charges when they needed to and this helped the danish as their combined arms of infantry and cavalry pushed back and destroyed the Swedish left flank.

Saturday 9 June 2018

18091212mm or a 2mm 1:1 refight of the battle of Gefrees , July 1809

This was the second tryout of my 2mm rules designed to fight battled at a 1:1 figure and ground scale , i have called them onetwoonetwo(mm) , this was a small engagement between a conscript french force and a regular Austrian force on the retreat from Wagram

i used google maps to get the lay of the land and what terrain was present , i also change a few of the Austrians as i didn't want all of them in brown as the Austrians were all Grenz at the time

so onto the battle here are two pictures of the battle setup , the inital setup and plan was supplied by a member of the 2mm Facebook Group and i executed his orders

The initial moves for the French were to bring their artillery into range and try to damage the Austrian right flank
the cavalry were to keep the Jaegers at bay and stop them from harassing the French columns

The French started the attack but some of the orders failed to get to their prospective commanders , and the French artillery failed in their dice roll to do any significant damage (the little blue dice represent the number of orders that can be spent by that unit) , on the opposite flank the Austrian Jaegers made a few pot shots at the cavalry forcing the cavalry to pull back out of range


The Austrians fire at the french columns and a half battery of Austrian guns pour canister into the flank of the French column


This resulted in the columns halting and one of them routing , in the ensuing melee the first line breaks as the other two french columns halt soaking the fire to allow a single column to break through the Austrian line and break the first Austrian line

The remaining 2 French columns managed to contact the second Austrian line and break them

Unfortunately the french decided not to pursue the routing Austrians into the woods , as they lacked the support from the rest of the army which would have allowed those troops to rally

The French could have spent more time firing their artillery but this would probably forced the Austrians into the cover of the woods and then to escape , if the Austrians had had some cavalry those french dragoons would have been an easy fight.

I stopped the battle at this point as 40% of the Austrians had broken but with the woods cover on the french right would prove too difficult to clear of enemy jaegers the french decided to let the Austrians withdraw , the french had 2 of their 7 battalions decimated down to raw status so to continue to advance up the road into the rest of the Austrians and Brunswicker's would be a little dangerous for the french.

all the figures were 3d printed from stl files from Forward march studios

Saturday 2 June 2018

A really small spring adventure

This was a quick playtest of my new 2mm 1:1 game of Eutaw Springs , i have written a set of rules specifically to playing 2mm on a 1:1 ratio and on a 1:1 ground scale  , thinking of a name perhaps OneTwoOneTwo(mm), i picked a small battle of Eutaw Springs and proceeded to play the British and to attack without preparing a full bombardment of the Americans and well very shortly it went 'orrible for the british

as you can see from the setup the British are in 1 line and are rated veteran , the guns average and on their right flank some elite flank coy's , all looks good and the first orders given were for the artillery to start opening up

after 2 moves advancing the british got to this position , it was then that it all went wrong as their commander lucked out on his orders and proceeded to faf about and do nothing allowing the Americans to rally the militia and then fire a devastating volley


Consequently
Half the British were running away but the British elite did manage to break through on the right flank but it was too little too late

I did find that if you dont plan your attack things donot go as planned and if you sit there and just wait for the enemy to do something that could also go wrong , Lee's legion spent the day fishing in the swamp as Greene was furiously keeping his militia forces together

Monday 28 May 2018

Going Green at Lobositz

This is a new little , pun intended 2mm big battles project , i drew the map and printed and then 3d printed and painted some 2mm figures from forward march studios which because i used PLA means that the figures and map are biodegradable , so on to the battle

for the rules i decided on Horse , Foot & Guns at half scale as all 2mm bases that i printed were 20mm in width , i also took some liberties with the setup and decided that the mist cleared earlier allowing Freddy to see the complete Austrian setup from the start , the troops were setup in their historical positions and the amount of bases to try and match the historical frontages , i used a might and reason scenario for the order of battle as a guide

Setup


The Prussians had the first turn and proceeded to advance


The Austrians proceed to counter the Prussians moves and consolidate their centre and push forward on their right flank (left of the picture)


The Prussians manoeuvre to try and limit the Austrians advance

The Austrians try to contain the Prussians by being particularly aggressive but some telling long range Prussian artillery fire does a little damage


At the end of the 4th turn the Austrians have lost 15% casualties by some bad dice rolls and trying to rely on their inferior cuirassiers , the Grenz on the hill also don't like getting up close and personal with those Prussian grenadiers , which left the Austrian commander with very little choice but to withdraw.

I do think that the HFG rules did a sterling job in helping me realise the little project into a fun little game and with all the various 3d files available i can see lots of other games in the foreseeable future.


Sunday 8 April 2018

No pike in this lament

A slightly different game was played using the pikemens lament rules but using the "by fire and sword" army lists for eastern europe for a Swedish cavalry force raiding a polish village , the pols sent a mixture of forces of different types and quality

i modified the shooting and combat stats to reflect the different capabilities of the units and there is a summery of those details at the bottom of this post

so on to the battle
Here is the setup with the Swedish on the right , the objective was to control the belfry on the hill , the vilage and the manor house at the bottom of the picture

the buildings i designed and 3d printed
I took a while before both forces got to this point as everyone kept failing their move orders , it must have been the rain
But the Polish hussars managed to see off the veteran Swedish cavalry while allowing the other Swedish cavalry to take the fight to the enemy in the village and the opposite flank
With the poorer Polish cavalry holding against greater odds , the Hussars gallop to the rescue
But Unfortunately for the Swedish cavalry an attack in the flank by the hussars sealed their fate and a lone cavalry stand is all that stands defending the belfry

on the whole a very enjoyable game with lots of dice chucking for pistols but with little or no effect , even the first charge by the Polish hussars failed to break the Swedish veteran horse but the second charge , the dice failed the Swedish and they rode off into the sunset
Here are my mods for this entertaining period

Sunday 25 March 2018

Powder Your Pike

Had a go at The Pikemen's Lament and fought a little known local battle not far from where i live , the castle has a web site Powderham Castle and yes it had snowed at the time of the battle.
Unfortunately the game did not replicate much of what happened in the battle as the defenders generally rolled poor for their activations whilst parliament rolled a-lot better.
I also altered the stats slightly and made firing a little poorer fo both sides , here are my mods

Shooting  , 1 stand fires with 4 dice
Infantry have 3 stands , generally 2 shot and 1 pike
Dragoon’s 2 stands
Cavalry 2 stands
-1 if shooting outside of 6” for infantry except rifles which are -1 for 12”
Shooting only directly to front of unit to any point on the enemy unit and measured from the front centre of that unit
All units have to wheel to turn and no part of a unit can move more than its normal move
Units may have grenades , this gives a +1 in melee single use only

Infantry units are 3 stands , you get 4 dice per stand
Early pike units that have a sleeve of shot will only roll 4 dice per sleeve but may not combine rolls from different sleeves a single order roll is required to fire all sleeves
a pair of pistols  7+/3”
hand gun 9+/6”
arquebus hit on a 8+/8”
matchlock musket on 7+/12”
flintlock musket 6+/12”
rifled musket 6+/18 , -1 outside 12”

The defenders had 4 units of infantry and a regimental gun and parliament attacked with 2 veteran units , a dragoon unit on foot only and would have had a unit of cavalry but those failed to turn up.


Setup

The Royalist could start to activate after the first shot was fired

Royalist is now moving out to engage the Parliament forces

The royalist attack with great vigor

But the shooting from the Parliamentary forces was even deadlier

Unfortunately for the Royalist their morale broke and the great retreat back into the castle happened

But with great resolve the Parliamentary forces took the castle

I thought this game was great fun and actually only took just over an hour to play , the rules i found did a great job of representing the period and played excellently solo though i never got to try out a cavalry charge as those Parliamentary cavalry failed to show , maybe they got lost somewhere between Crediton and Powderham Castle

This is what actually happened


A Powderham skirmish
The western side of Exeter and the Exe estuary were still held by the Royalists, who had a large force in Powderham Castle. On 14th December 1645, a Parliamentary force under Captain Dean of 200 foot and dragoons crossed the river in rowing boats from Nutwell, but finding the castle more heavily defended than they expected, they fell back to Powderham Church, were they were resupplied from across the river. After the Powderham Castle garrison was reinforced by 500 Royalists from Exeter, they attacked Captain Dean's force which was barricaded in the church; for three hours a particularly nasty battle raged, with grenades thrown against the building, and lead balls streaking back and forth.
Only the advance of a Parliamentary force from Crediton, under Hardress Waller, into Exminster, relieved the pressure on the church, and forced the Royalist besiegers back into their castle stronghold, leaving the snow covered church yard splattered with blood. The next day the freezing temperatures in the unheated church proved too much for the small force and Captain Dean and his men rowed silently back across the river to Nutwell.

During the Civil War Powderham Castle was garrisoned by 300 Royalist soldiers under the command of Sir Hugh Meredith. In December 1645 a Parliamentarian detachment under the command of Sir Thomas Fairfax tried, without initial success, to capture it but it fell on 25 January 1646 to Col. Robert Hammond. The castle was badly damaged in the assault and remained, in places, open to the elements until the early 1700s when it was repaired by Sir William Courtenay, 2nd Baronet .

Friday 16 March 2018

It's cold out there

Had my first game of Lion Rampant and did a little foray into the baltic which i must say was very enjoyable , i modified the stats slightly to give the Samogitians the ability to operate in their home terrain easier and to provide a more flavourful game, the stream , woods and hills were considered rough going , my figures were 15mm and mounted on 25mm circular bases and i used 1/2 inches so effectively cutting everything down by half

the stats were modified as follows

Teutonic Knights no mods , kept these as the base value and modified others in relation to these troops
Mounted Men at Arms :- (5+ to 6+) Chance of movement decreased due to poor terrain
Spearmen :- (4+ to 5+) Courage decreased due to skirmishing of enemy and harassment of troops while in enemy lands
Crossbowmen :- (4+ to 5+) Courage decreased due to skirmishing of enemy and harassment of troops while in enemy lands

Samogitians
Foot Men at Arms :- (5+ to 4+) Chance of movement increased due to native terrain , Armour Decreased due to poorer quality (3 to 2) , attack Value decreased due to poorer weapon quality (3+ to 4+)
Archers :- (6+ to 5+) Chance of movement increased due to units used to native terrain
Bidowers :- (5+ to 4+) Chance of movement increased due to units used to native terrain

The story behind the Battle is that the Teutonics were on a mission of burn the 3 buildings


A slow advance by the Teutons whilst the Sammy's Rushed towards the village to defend it

The Sammy Bidows moved up and started peppering away at those deadly crossbows

Which annoyed the knights who showed them who was boss and wiped them out but the Teuton men at arms deciding not to get too involved with the other Sammy warband and cower on the hill and eventually running away

And then the knights got the bit between their teeth and went on to wipe out the Sammy bowmen who would have shot but failed to activate

Everything else on the Sammy side went to defend the village

The final positions of a Sammy warband and their only bidower hiding in the buildings... so ended with the roasting of the Sammy forces

This was a good fun battle and played very well solo especially if the stats are modified to add flavour to the game

I think another go with the pikeman's lament into the late 17 century and another modifier of those rule stats to cope with some grand alliance games